
It’s no secret that Arizona summers can be brutally hot, and when the triple digits climb higher, it becomes necessary to seek shelter. Misting systems can take the edge off the unforgiving weather and are a popular solution since outdoor air conditioning is far more expensive. This guide will demonstrate the steps for installing your own DIY outdoor misting system to beat the heat this summer.
Plan and Measure
If you would like to avoid 73 trips to your local hardware store, it can help to draw out the area you would like cool and then make a list of everything you’ll need to start the project. You’ll need several measurements. First, you need to know the distance between your power source and your water source. Then you’ll need to measure the total distance you’ll need for the mist line. The mist line hangs from a set of clamps from the parallel beams on the patio; the clamps should be spaced between three and five feet (3’ – 5’) apart.
You’ll also need to account for the number of line connectors and nozzle heads. Most hardware stores carry 3’-6’ lengths of tubing; you’ll have to count out the number of connectors based on the total number of pieces of tubing your area requires. You’ll also need the necessary primers and adhesive for the tubing, as well as some basic electrical wiring for the pump.
Now is also the time to think about the weatherization of the system. While Phoenix doesn’t experience many freezing nights in the winter, the freezing nights we do get can damage your system from water left in the pipes. It is recommended to install a drain valve that will allow you to open the lines and drain whatever water may be present.
Materials you will need:
- A minimum 1000 psi high-pressure pump
- 3/8” high-pressure mist tubing. We recommend stainless steel as it doesn’t rust
- High-pressure tubing fittings and connectors, ball valve, adapters, and ceiling clamps
- Trencher (optional, depending on the amount of trenching required)
- Tubing cutters
- Primers, adhesive (depending on the type of mist line you select)
- Voltage tester
- 9’ ladder, screws, drill, etc.
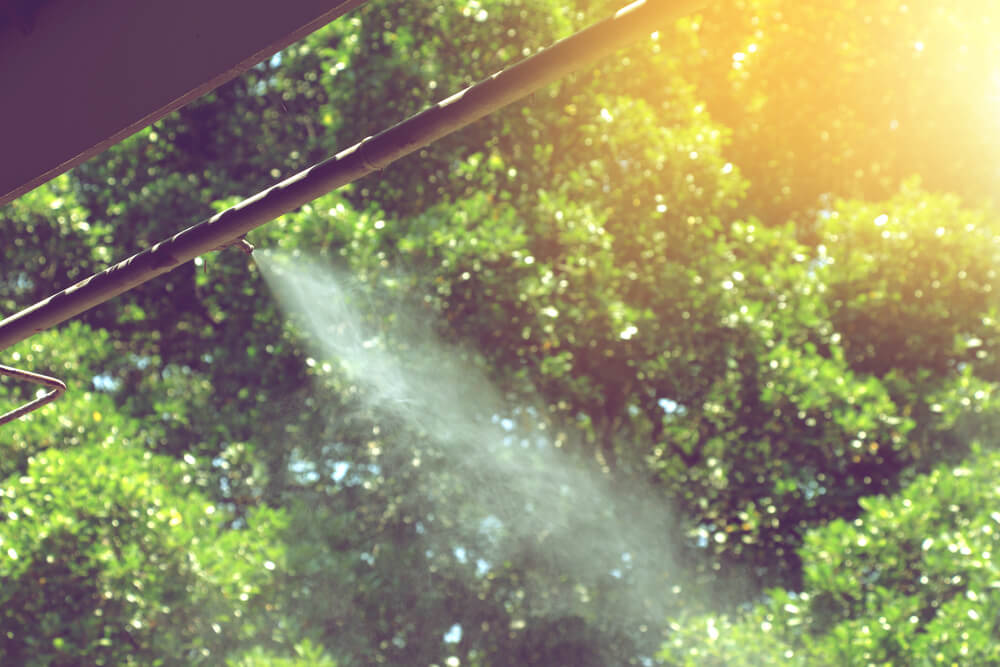
Things to know: a true high-pressure misting system will emit a very fine mist that will cool an area when installed properly. The mist lines need to be placed at a precise height to be effective. Where possible, installation at or above 8’ is ideal, as the area will be cool without making patio furniture or people wet. However, systems installed too high create a pleasing, misty effect, but are ineffective in cooling the space.
Hang The Lines
Screw the clamps into the spots you marked and measure again to make sure you don’t need any adjustments. To reduce the risk of leaks, 20’ sections of stainless steel tubing is recommended. If your hardware store doesn’t carry this length, you’ll have to connect shorter sections together.
Make sure to properly join tubing sections with the correct high-pressure compression fittings. We recommend using DuoLock fittings for the best performance.
Install The Pump
Select a pump that is compatible with your available power source (or hire an electrician to provide the proper amount of power for the pump you select). A high-pressure misting system requires at least a 1000 psi high-pressure pump. Such a pump will increase your water pressure to the rates necessary to atomize water.
These pumps generally run off 110 volts and a 15 amp breaker. It’s important to know what else runs off the circuit you’re connecting the pump too, or you could trip the breaker every time you turn the system on. If you are unsure about your electrical load, it is wisest to contact an electrician that can provide the proper wiring and GFCI protection.
Other things to consider are the location of your pump from the water source, as the two must be connected. The pump needs to be on a flat surface and out of direct sunlight, which may overheat the motor under prolonged exposure.
In addition, some homeowners do not like to see or hear the equipment. Do your research on enclosed pumps, or pumps that have covers available as an add-on accessory. A pump cover can help reduce some of the noise, as well as protect it from the elements. If pump covers aren’t available in your area, consider your natural landscape. Pumps can be hidden behind foliage or other decorations. Keep in mind you’ll want the pump accessible for maintenance, so don’t cover it so well you can’t get to it!
Connect Water And Power
When the pump is secured next to a water and power source, you can connect the components. If your electric source doesn’t reach your pump or you need additional plumbing, you’ll need to either relocate or install extensions. Make sure the lines are trenched to the proper depth, and that you always look for natural gas lines, power lines, etc. Call Blue Stake before you dig!
The misting system needs to have air and dirt cleared out of the lines, so once everything is connected, run water through the system for about 30 seconds until it’s clean. Follow the tubing to make sure there aren’t any leaks where the compression fittings are joined.
Install The Mist Nozzles
Mist nozzles should be angled differently and various heights. Higher systems can be almost vertical, while lower hanging systems should be more horizontal. Experiment with your system to see what works best for you. Install all the nozzles, then check them by running water through the system to make sure they don’t bleed. And remember, a high-pressure system shouldn’t have nozzles that drip!
Maintenance
If your misting system is secured to hard and rigid surfaces, the vibration caused by water pressure may dislodge connections over time. It’s especially important to check the tubing and mounts after weather events to ensure your safety.
In addition to maintaining the mist line, the mist pump will need annual maintenance. The filter should be inspected annually and changed when necessary. In addition, when winterizing the pump, you’ll want to fill with antifreeze and store it properly. At the start of the mist season, you’ll want to change the oil and double-check all the components for wear and tear.
Due to the hard water in our area, the hard water build-up will begin to form inside the nozzles. You can use any number of DIY solutions like vinegar and water to scrub the hard water deposits away. Once you see nozzles that start to drip rather than provide mist, you’ll know it’s time to clean the nozzles. If hard water is a concern to you, check with your local water treatment experts and inquire about water systems that eliminate hard water. You’ll save time cleaning hard water deposits from nozzles, windows and patio furniture. We recommend the PureMist water purifier; it can be adapted to any high-pressure mist system.
Professional Installation
The process of installing a misting system yourself is by no means an easy task. It can be time-consuming and challenging to set up everything correctly and make the project pleasing to the eye. The electrical and plumbing work is sometimes better left to experienced professionals.
Aqua Science delivers quality service that quickly and efficiently sets up a seamless misting system for any private or business space. Locally owned with over 30 years of experience, our technicians are capable of any job and all of the accompanying work. Aqua Science provides all the building materials and sets up power lines and plumbing for the high-pressure pump that keeps misting systems cooling areas of any size.
Professional installation fits discreetly into your outdoor decor and is gauged, so there are no leaks or dripping nozzles. The perfect atomization of mist creates a comfortable environment and consistent coverage throughout the area.
Book a free consultation or contact Aqua Science with your questions to prepare for the summer with a lasting and aesthetic misting system that will keep you cool without sacrificing style.